Cut and Paste Worksheets: 11 Free Printable
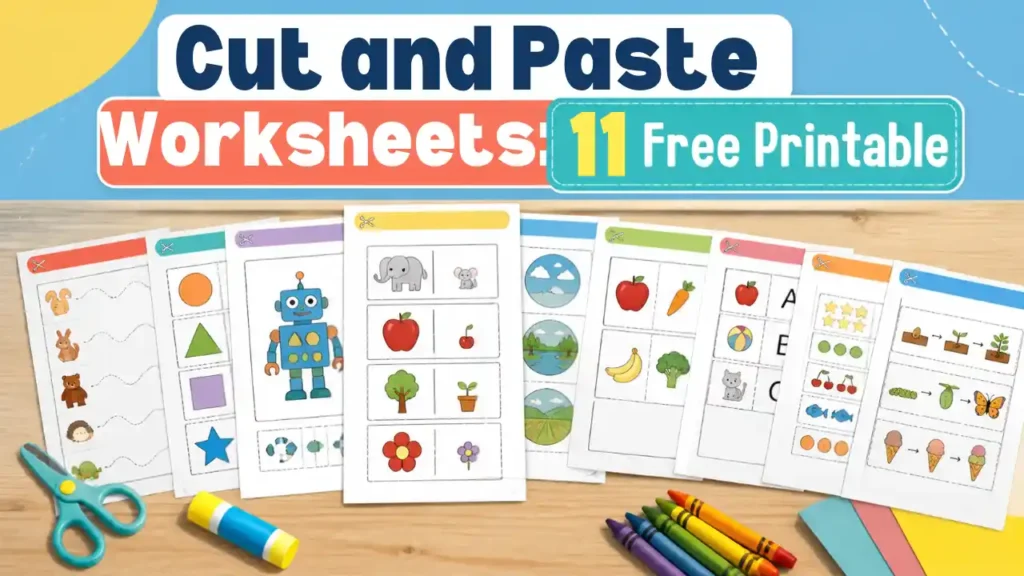
These cut and paste worksheets give your child 11 free printable pages that build scissor skills and early learning at the same time. The pack starts with two cutting practice pages, then moves to a shape robot, three sorting pages, a letter page, two counting pages, a pattern page and a story order page. A one page answer key is for the grown up. Print the whole PDF or pick the pages that match your child’s scissor skills, and use the short tips below to get started.
What is in this pack of cut and paste worksheets
Each page has a mat at the top for pasting and a row of pieces to cut out below it. That means every cut and paste worksheet is one sheet, with no extra printing. The ages are a guide, so move your child up or down as needed.
| Page | Worksheet | Age | What your child does |
|---|---|---|---|
| 2 | Scissor Warm Up | 3 to 5 | Cuts along six lines, from snips to hills |
| 3 | Cut Out the Shapes | 4 to 6 | Cuts out six shapes, from a square to a star |
| 4 | Cut and Paste a Robot | 4 to 6 | Matches ten cut out shapes to a robot outline |
| 5 | Sort: Big or Small | 3 to 5 | Pastes 8 pictures into two boxes |
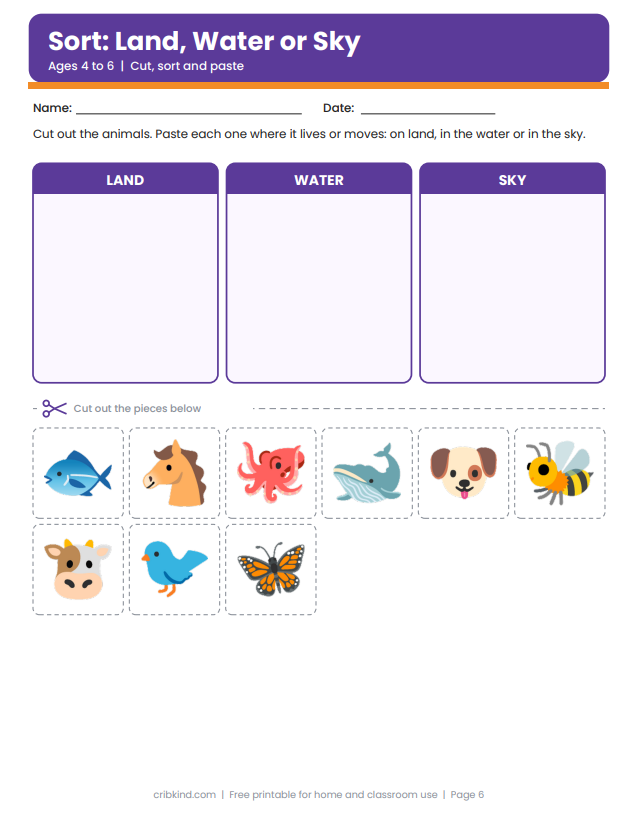
| 6 | Sort: Land, Water or Sky | 4 to 6 | Pastes 9 animals into three boxes |
| 7 | Sort: Fruit or Vegetable | 4 to 6 | Pastes 8 foods into two boxes |
| 8 | Paste the Beginning Letter | 4 to 6 | Matches 6 letters to pictures by first sound |
| 9 | Count and Paste: 1 to 5 | 3 to 5 | Counts pictures and pastes the number |
| 10 | Count and Paste: 6 to 10 | 5 to 6 | Counts up to 10 and pastes the number |
| 11 | Finish the Pattern | 4 to 6 | Pastes the next two shapes in four patterns |
| 12 | Put the Pictures in Order | 4 to 6 | Pastes 6 pictures into two first, next, last stories |
How to teach scissor skills before the cutting
Cutting is a skill that grows in steps, and the ages vary from child to child. Two guides on scissor development, one from Growing Hands-On Kids and one from CanChild, a Canadian research center on childhood disability, describe nearly the same path. Children often start to snip paper around age 3. By 3 or 4 they can follow a straight line fairly well. By 4 or 5 they can cut curves and simple shapes, and by 5 or 6 they work on harder shapes.
Here is a simple setup that helps at any age.
- Check the seat. Your child’s feet should rest on the floor and the forearms on the table.
- Give each hand a job. One hand holds the scissors and the other is the helper hand that holds and turns the paper.
- Show thumbs up. The thumbs go on top for both hands. A small sticker on each thumb is a good reminder.
- Start with wide, simple lines. Make a line thicker with a marker if your child needs it, then move to thinner ones.
- Stay close. Bring out the scissors only when you can watch, and never leave a child alone with them.
If scissors feel too hard, build hand strength first. Snipping play dough or straws, picking up pom poms with tongs and using a hole punch all help. Loop handle or spring loaded scissors can also make opening and closing easier.
Cutting practice: lines and shapes
Pages 2 and 3 are not cut and paste pages, and that is on purpose. A child who cannot yet steer scissors along a line will struggle to cut out a picture. Scissor Warm Up (page 2) has six strips, ordered from easy to hard: snips, a straight line, a zigzag, steps, a wavy line and hills. Steps need a turn of the paper at every corner, and waves and hills need a smooth curve.
Cut Out the Shapes (page 3) has a square, a rectangle and a triangle on the top row, and a circle, a heart and a star on the bottom row. Start with the top row. The bottom row suits an older child. Glue the finished shapes onto colored paper to make a house, a boat or any picture your child dreams up.
Cut and paste worksheets for kindergarten and preschool
Once straight lines feel easy, move to pages 4 to 12. Think of them as kindergarten cut and paste worksheets, but the early ones suit cut and paste preschool worksheets too, such as the big or small sort and the count to 5 page. For a younger child, cut the pieces apart yourself and let your child do the pasting.
Cut and Paste a Robot (page 4) asks your child to match ten shapes to outlines: a square head, a big rectangle body, two arms, two legs, two eyes, a mouth and an antenna. It practices shape and size matching, and it makes a fun little robot.
The sorting pages (5 to 7) are a first step into grouping. Big or small uses an elephant and an ant. Land, water or sky asks where an animal lives or moves, and fruit or vegetable separates apples and grapes from carrots and corn. A child who gets stuck can say each picture’s name out loud, then decide which box fits.
Letters, numbers, patterns and order
The last pages bring in early reading and math. Paste the Beginning Letter (page 8) shows six pictures, and your child pastes the letter that starts each one. It pairs well with our beginning sounds worksheets if your child wants more picture and sound practice.
Count and Paste (pages 9 and 10) has five rows on each page. Your child counts the pictures and pastes the matching number, from 1 to 5 and then from 6 to 10. For counting beyond 10 and adding, our kindergarten math worksheets are the next step.
Finish the Pattern (page 11) has four rows that repeat, such as a red circle and a blue square. Your child cuts out the next two shapes and pastes them in order. Put the Pictures in Order (page 12) tells two short stories, an egg that hatches into a chick, and a bedtime of bath, book and bed. The words first, next and last help a child explain what happens.
Cutting and gluing worksheets: how to run them
Cutting and gluing worksheets can get messy, so a little planning helps. A glue stick is easier for small hands than liquid glue, and one thin coat is enough. Keep a scrap tray on the table so small paper pieces do not scatter, and set the pages out of reach of any baby or toddler who still puts things in the mouth.
Cut and paste printables can also be reused as a short lesson. Say the picture’s name, decide where it goes, cut it out, glue it down and read the answer back to you. For more fine motor ideas that suit this age, see our list of worksheets for preschoolers.
Kindergarten cutting worksheets and letter practice
If your child is also learning to write, pair the cutting pages with letter formation. Our letter tracing worksheets build the same hand strength from a different angle, and a few minutes of each in one sitting works well for many families.
How to print these cut and paste worksheets
The pages are US Letter size, 8.5 by 11 inches. In your printer settings, choose actual size or 100 percent, so the shapes and the pieces keep their size and still fit the mats. Plain paper works, but a slightly heavier paper makes cutting easier for small hands. Your child gets pages 2 to 12. The answer key at the back is yours.
Free download: Get all 11 cut and paste pages and the answer key as one PDF
This pack is free for home and classroom use. Please do not sell the file or put it on another website.
Frequently asked questions about cut and paste worksheets
Are these cut and paste worksheets free?
Yes. The pack is a free PDF with no email step and no account. You may print copies for your own family or classroom, but please do not sell the file.
What age should a child start with cut and paste worksheets?
Many children begin snipping paper around age 3, then cut a straight line at 3 or 4. The cutting practice pages here suit ages 3 to 5, and the sorting pages usually work best from about age 4. Go by your child’s skills, since every child differs.
Do I need to cut the pieces out for my child?
Not always, but it is fine to do it for a younger child. Cut the pieces apart yourself and let your child choose where each one goes and do the pasting. You can add the cutting back as your child grows more confident.
What scissors and glue are best?
Use kid safety scissors that fit the hand, and loop handle or spring loaded scissors if opening and closing is hard. A glue stick is tidier than liquid glue. Always stay close while a child is using scissors.
Is there an answer key?
Yes. The last page gives the answers for the sorting, letter, counting, pattern and order pages, plus notes for the robot and the cutting practice pages. A few answers can have more than one right order, and the key says which.
My child cuts off the line or tears the paper. What should I do?
Go back a step. Try wider lines, a thicker marker line, stiffer paper or shorter lines, and build hand strength with play dough snipping or tongs. Make sure your child’s feet are on the floor and the helper hand holds the paper.
Can I use these cut and paste worksheets in a classroom?
Yes. Print a set for each child and keep the answer key page for the teacher. Cutting practice pages 2 and 3 work well as a warm up before a bigger activity.
Start with the warm up page this week and let your child choose one picture page to cut and paste. A few short cutting sessions are more useful than one long one, and your child will have something to show off at the end.